1.) Create "ASP.NET Core Web App (C#)" in Visual Studio
2.) Add the SignalR client library
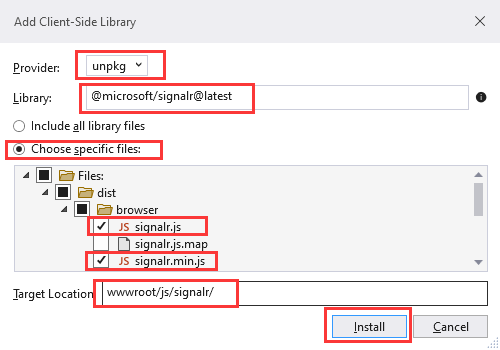
- In Solution Explorer, right-click the project, and select Add > Client-Side Library.
- In the Add Client-Side Library dialog:
- Select unpkg for Provider
- Enter @microsoft/signalr@latest for Library.
- Select Choose specific files, expand the dist/browser folder, and select signalr.js and signalr.min.js.
- Set Target Location to wwwroot/js/signalr/.
- Select Install. LibMan creates a wwwroot/js/signalr folder and copies the selected files to it.
3.) Create a SignalR hub
namespace WebApplication1.Hubs    // this name may be different from your project name
{
    public class ChatHub : Hub
    {
        public async Task SendMessage(string user, string message)
        {
            await Clients.All.SendAsync("ReceiveMessage", user, message);
        }
    }
4.) Configure SignalR
The SignalR server must be configured to pass SignalR requests to SignalR. Add the following highlighted code to the Program.cs file.
using WebApplication1.Hubs;    // this name may be different from your project name

var builder = WebApplication.CreateBuilder(args);
...
builder.Services.AddSignalR();

var app = builder.Build();
...
app.MapHub<ChatHub>("/chatHub");

app.Run();
5.) Add SignalR client code
"use strict";

var connection = new signalR.HubConnectionBuilder().withUrl("/chatHub").build();

//Disable the send button until connection is established.
document.getElementById("sendButton").disabled = true;

connection.on("ReceiveMessage", function (user, message) {
    var li = document.createElement("li");
    document.getElementById("messagesList").appendChild(li);
    // We can assign user-supplied strings to an element's textContent because it
    // is not interpreted as markup. If you're assigning in any other way, you
    // should be aware of possible script injection concerns.
    li.textContent = `${user} says ${message}`;
});

connection.start().then(function () {
    document.getElementById("sendButton").disabled = false;
}).catch(function (err) {
    return console.error(err.toString());
});

document.getElementById("sendButton").addEventListener("click", function (event) {
    var user = document.getElementById("userInput").value;
    var message = document.getElementById("messageInput").value;
    connection.invoke("SendMessage", user, message).catch(function (err) {
        return console.error(err.toString());
    });
    event.preventDefault();
});
@page @model IndexModel @{ ViewData["Title"] = "Home page"; } <div class="container"> <div class="row p-1"> <div class="col-1">User</div> <div class="col-5"><input type="text" id="userInput" /></div> </div> <div class="row p-1"> <div class="col-1">Message</div> <div class="col-5"><input type="text" class="w-100" id="messageInput" /></div> </div> <div class="row p-1"> <div class="col-6 text-end"> <input type="button" id="sendButton" value="Send Message" /> </div> </div> <div class="row p-1"> <div class="col-6"> <hr /> </div> </div> <div class="row p-1"> <div class="col-6"> <ul id="messagesList"></ul> </div> </div> </div> <script src="~/js/signalr/dist/browser/signalr.js"></script> <script src="~/js/chat.js"></script>
6.) Run the app locally
- Select Ctrl+F5 to run the app without debugging.
- Copy the URL from the address bar, open another browser instance or tab, and paste the URL in the address bar.
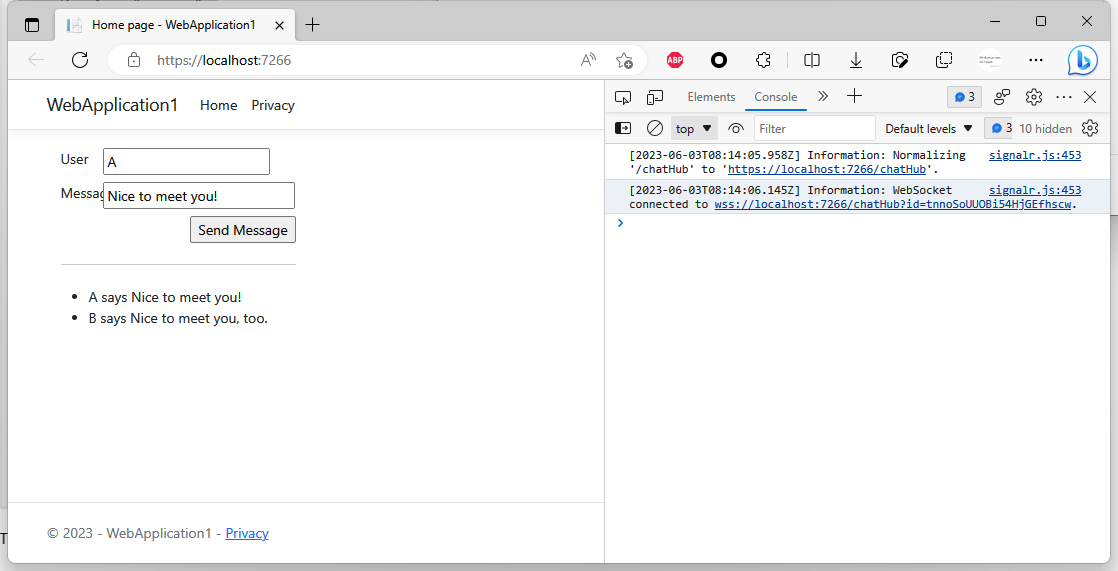
- Choose either browser, enter a name and message, and select the Send Message button.
- The name and message are displayed on both pages instantly.
The ChatHub connection serves at https://localhost:7266/chatHub. The WebSocket connection serves at wss://localhost:7266/chatHub (your port number may be different, and the id=xxx is automatically generated when establishing the connection).
Once, you have done local testting and websocket works good, you can deploy your project via visual studio or FTP method.


